Lonca vs Lonca
Savaşa Katıl!
Loncanız ayakta kalmak ve güç kazanmak için diğer loncalar ile savaşmaktadır. Amacınız loncanızın arazisini genişletmek, topraklarınızı korumak, lonca seviyesini yükseltmek ve üyeleriniz için çeşitli bonuslarla şöhret kazanmaktır.
Loncanız her gün GvG (Lonca vs Lonca) savaşlarında yeni bölgeler ele geçirmeli ve kendi kontrolünde olan bölgeleri korumalıdır. Her günün sonunda (günlük geri sayım bittiğinde), loncanın elinde bulunduğu bölgelere göre güç puanı hesaplanır ve bu puanlar lonca seviyesinin artmasına katkı sağlar. Daha iyi ödüller almak için Lonca seviyenizi arttırın!
Bu eylemlerde yer almak için, bir loncanın üyesi olmanız gerekmektedir. Lonca boyutundan bağımsız olarak demir çağı veya daha ileri çağlardaysanız loncalara katılabilirsiniz. GvG savaşları da savaş puanı vermektedir. Bu nedenle PvP turnuva kulesi ile GvG arasında seçim yapmak zorunda kalmazsınız.
GvG sadece oyunun masaüstü sürümünde geçerlidir.
GvG‘ye erişmek için, resimde sağ alt menüde yer alan simgeye tıklayın:
Guild Continent Map

All action takes place via the GvG continent map, which is a special map designed for inter-guild battles and warfare. The map is split up into provinces, which you can see are separated by rivers and mountain borders. All but one of the provinces represent an era - the bottom-most one is a special “All Ages” province.
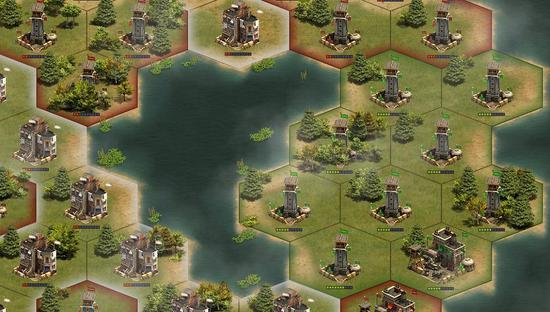
The GvG continent map allows you to see a quick overview of your guild's influence in different provinces and also serves as the entry point into those provinces, where your guild will do battle. In the image below, you can see your own guild's area of influence highlighted in green, with enemy territory shown in red. Orange areas indicate territory which is owned by NPCs, in which player guilds have yet to expand.
Your guild can fight in a single province, or all of them... the choice is yours! However, when fighting in one of the era-specific provinces, you can only do battle using units and goods from the same age as the province you are fighting in... so, for example, in the Iron Age map, you can only use units and goods from the Iron Age.
All-Ages province
At the bottom of the map there is a smaller, special “All Ages” province. In this province you can use units from any era in your battles. You cannot use goods on this map - the siege costs, as well as the costs for placing defending armies, can only be paid with medals.
Provinces
The battles are fought in the province map. With the help from your guild mates you lay seige to a sector, and then attack it.
Sectors
The province map consists of sectors, which are represented by hexes. It is your guild's job to conquer these sectors - and defend them from invasion - in order to expand your territory. There are two stages to conquering a sector: first you lay seige and then you must attack!
Sectors are coloured according to who owns them:
- Red - Enemy guild
- Green - Your guild.
- White - Neutral (NPCs).
Landing zone
When you open the Guild province map for an era, you will notice that some of the map is dark, which indicates unexplored, unclaimed territory. The active area is where you can land your first army and establish your guild's headquarter.
Which sector to attack?
When you initially enter a province map, you are able to place a siege army in any of the sectors in the landing zone (white area), or on a river sector next to or in another guild's area. The rest of the hexes still belong to the NPCs but can only be attacked if you control an adjacent hex.
Sector status
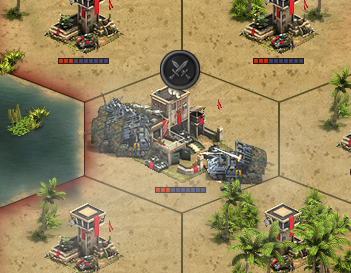
You can see in the map above if a sector is under siege, as it has an icon with crossed swords above it. A shield icon above a sector means that the sector is protected, as it was recently conquered and cannot currently be attacked. Protected sectors also do not count for attacking and placing siege armies. This means that if you only have one, protected sector next to an enemy sector you want to attack, you will need to wait until the protection is lifted from your sector before you are able to deploy your siege army there.
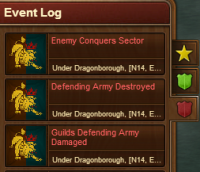
Event log
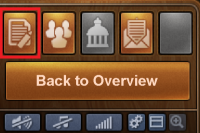
The event log records actions made by your own guild members and enemy guilds. You can access it from the province map by clicking the event log button in the menu at the bottom left of the screen.
Three different tabs are available in the log:
- Important events
- Your guild actions
- Enemy guild actions
Clicking on a tab in the event log will show a list of recent events and where the event took place. Clicking the log entry will center the map on that area.
Sectors
You can view information about a sector by hovering your mouse over it in the province map. When you control a sector, you gain "power" which you can see in the sector's information. Different sectors provide more or less power and, as you gain power, this converts to experience points for your guild, which are used to increase your guild level.
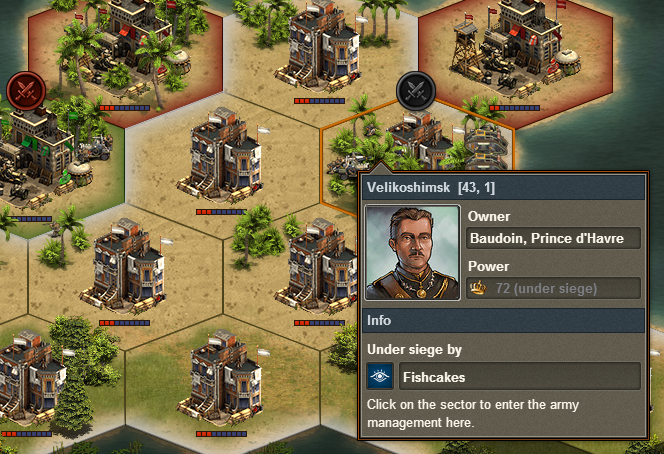
The white color of the hex in the image indicates that the sector is controlled by a NPC. You can also see the guild's co-ordinates (handy for communicating strategies with your guild members!), power, and if the sector is under siege, information about the besieger is also displayed.
Sector options
When you click on a sector, the options displayed depend on whether the sector belongs to your guild, if an enemy guild controls it, or an NPC (in which case no options are shown). Pictured is an example of sector options for one of your own guild's sectors.
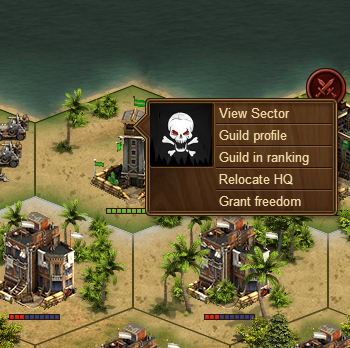
Clicking the Profile option will take you to your guild's profile, and Guild in Ranking will bring up the Guild Ranking screen.
Relocate HQ
Every day, your support pool bonus is applied first to your HQ, which gets the strongest bonus, and then to adjacent sectors, spiraling outwards. This makes your HQ a strategic center which your guild may wish to relocate on occasion. Clicking the Relocate HQ button will move your HQ to the chosen location, but this can only be done once per day. Note that the support pool bonuses for sectors will not change until the next daily calculation.
Grant freedom
If a sector is no longer strategically useful for your guild, you can choose to grant it freedom. This will result in the sector becoming controlled by an NPC, and a goods payout will be made to your guild treasury, which is based on the territory owned by your guild, and the number of siege armies it has placed. Remember that each "trusted" player can only grant freedom to four sectors per day.
Conquering a sector
Enter an enemy sector by clicking its hex and selecting the "view sector" option (skipping the "view sector" option when entering an NPC-controlled sector), and this will take you to the army management screen. At the top right of the screen is a space where you can deploy armies to the sector. There are two possible options for deploying armies: siege army (if you don't own the sector), and defense armies (if you do). As we are trying to conquer the sector, in this case you would want to deploy a siege army.
Deploying a siege army
Before you can begin attacking, you first need to stake a claim to the sector you want to conquer. Deploying your guild's first siege army costs goods, and the amount required which is shown when you hover over the deployment button.
Attacking a sector
Once you have laid claim to the sector you want, and deployed your siege army, the attacks can begin to conquer it! One single attack is unlikely to be enough and it may take many successive attacks to gain control of a sector. You need to use your own army to attack... you cannot attack with the siege army. Click the red defensive icon in the army management screen to view your enemy's defensive armies.
It's possible to have up to 8 armies defending a sector, and you need to defeat them all to gain control of the sector. In this case there are two defending armies. Each time you attack, your army will fight against a random defending army (you cannot choose which army to attack). Below the army's icon, you can see the army's health bar. The armies in the picture have 8 and 9 health respectively, which means they need to be defeated 17 times total in battle to be utterly destroyed and removed from your opponent's defending armies. Beware - you need to defeat each army multiple times for it to be completely destroyed. When you have killed all of your opponent's defending armies, your siege army moves in and becomes the sector's first defending army.
HINT: After you have beaten a defending army for the first time, the units in the army become visible when you hover your mouse over the army's icon in the army management screen. Once the army has received damage, the units in that army are visible to everyone. Another guild has laid siege to the sector I want / I own
You may find that another rival guild has laid claim to a sector you want or that belongs to your guild, and placed a siege army there. All is not lost! You can attack and destroy your enemies' siege armies in much the same manner as you destroy defending armies.
After you win a sector
After you have gained control of a sector, it is protected from attack for a period of time, until the end of the "day", which is indicated by a countdown timer at the top left of the province map. When the countdown reaches zero, the day ends and scores are calculated for the previous day. The protection is also lifted. It's in your interests to hold on to a sector until the timer runs out!
Defending a sector
Every day when the countdown runs out, scores are calculated for the previous day. You need to be holding on to a sector when the timer runs out for it to count! So, it's in your interests to hold on to a sector for as long as you can, or at least until the timer reaches zero.
When you conquer a sector you start with only one defending army (which was formerly your siege army). You can place up to seven additional armies in the empty slots, making a total of eight. But you need to pay goods to unlock each army slot, and the cost increases with every slot you unlock.
As with siege armies, units deployed to defensive armies belong to your guild and cannot be retrieved. As the cost of goods rises, a single person may no longer be able to afford to unlock slots, and so goods contributing to unlock slots go into a guild treasury, which holds goods until they are ready for use.
Under siege
When one of your sectors is under siege by an enemy, the sector will not produce power. Most actions are also blocked (placing a defending army, relocate HQ or grant freedom). So, it's in your guild's interest to kill off any armies that are besieging your sectors.
Destek Havuzu
Her loncanın, lonca kıta haritası savaşlarında bonuslar kazandıran bir “destek havuzu” vardır. Bir loncanın destek havuzu, loncanın seviyesine göre ve oyuncularının sahip olduğu belirli bazı binalara göre hesaplanır. Lonca destek havuzu, söz konusu loncanın sahip olduğu sektördeki bütün birliklerine yüzdesel olarak bir saldırı ve savunma bonusu sağlar.
Destek havuzu, öncelik sırasına göre (önce lonca merkez bölgesi, sonra ona komşu bölgeler ve sonra da daha uzak bölgeler şeklinde) loncanın sahip olduğu sektörler arasında dağıtılır. Destek bonusunun ne kadar olduğunu mouse'nuzu bir ordunun üzerine getirerek görebilirsiniz. Savunma ve kuşatma orduları merkeze yeterince yakınsa bir destek bonusuna sahip olabilirler. Bir loncanın destek havuzu her gün geri sayım sona erdiğinde hesaplanır.
İPUCU: Loncanızın merkezi en yüksek destek bonusunu alır ve merkezden uzaklaştıkça bonuslar düşer.
Günlük Hesaplama
Günlük hesaplama her gün belirlenen zamanda gerçekleştirilir. Lonca kıta haritasındaki eyaletlerde hesaplamanın gerçekleşmesine ne kadar kaldığını gösteren geri sayımı görebilirsiniz. Hesaplama sırasında aşağıdaki adımlar gerçekleşir:
- Lonca seviyesi hesaplaması.
- Lonca sıralaması hesaplamaları.
- Destek havuzu/destek bonusu hesaplaması.
- Lonca gücü puanlarının eklenmesi
- Sektörlerdeki saldırı korumaları kaldırılması.
- Önceki gün lonca merkezinizi değiştirmişseniz, bu seçenek sıfırlanır ve tekrar bir kere daha lonca merkezini değiştirebilirsiniz.
Lonca Seviyeleri
Lonca seviyesini yükseltmek, loncanızın sıralamadaki yerini yükseltir ve tüm üyelerine bonuslar kazandırır. Bazı bonuslar loncanıza lonca kıta haritasında faydalar sağlarken bazı bonuslar sadece oyunculara fayda sağlar. Lonca menüsü üzerinden ulaşabileceğiniz lonca seviye penceresinde, loncanızın seviyesini ve tüm seviyeler için sağlanması gerekenleri görebilirsiniz.
Ödülleri ve gereksinimleri görmek için lonca seviyesi penceresinin altındaki okları kullanabilirsiniz.
Lonca Seviyesi Nasıl Yükseltilir
Lonca seviyesini yükseltmeniz için lonca gücü toplamanız gerekmektedir. Bölge ele geçirerek ve elinizde tutarak lonca gücü kazanırsınız. Kontrol ettiğiniz her sektör lonca gücü verir ve her günün sonunda loncanızın güç puanları hesaplanır ve loncanızın toplam puanına eklenerek seviye atlamanıza katkı yapar.
Lonca Bonusları - Lonca seviyenizi yükselttikçe loncanız için aşağıdaki bonuslar da artacaktır:
Prestij bonusu - loncanın günlük prestij sıralamasına prestij puanı ekler
Lonca destek havuzu - Loncanın destek havuzuna eklenir (lonca kıta haritasında saldırı/savunma bonusu sağlar)
Oyuncu bonusları - Bazı seviyeler aynı zamanda oyunculara bonus kazandırır.
Asker yetiştirme desteği - birliklerin yetişmesi ve iyileşmesi için gerekli süreyi azaltır (yeni süreler asker yetiştirme ekranlarında görülebilir).
Araştırma Desteği - yönetim binanızdan ilave ilerleme puanı almanızı sağlar.
İnşaat İndirimi - bütün binaların para ve erzak maliyetini belli oranda azaltır (Orijinal maliyetler araştırma ekranında gözükürken, indirimli maliyetler inşa menüsünde gözükür).
Lonca Sıralaması
İki tane lonca kıta haritası sıralaması vardır; lonca sıralaması ve harita sıralaması. Lonca sıralaması oynanan dünya ölçeğindedir ve loncanız seviye atladıkça seviye bonuslarından kazanabileceği, toplam prestij puanına göre hesaplanır. Eyaletler ise loncanın o eyaletteki gücüne göre belirlenen kendi harita sıralamasına sahiptir. Harita sıralamasının en üstlerine çıkmak sadece loncanızın şöhretine ve itibarına katkı yapmaz, başka özel faydaları da vardır.
Her gün yapılan yeni harita sıralamaları hesaplarından sonra, İlk üç loncaya bir güç bonusu verilir. Bonuslar aşağıdaki gibidir;
1. lonca - %15
2. lonca - %10
3. lonca - %5
Lonca Yetkileri ve Lonca Hazinesi
Lonca Yetkileri
Bütün lonca eylemleri her lonca üyesine açık değildir. Aşağıdaki eylemler lonca üyesinin “Güvenilir” yetkisine sahip olmasını gerektirir:
- Savunma yerinin kilidini açmak
- Savunma ordusu değiştirmek
- Kuşatma ordusu konumlandırmak ya da silme
- Özgürlük vermek (her bir oyuncu sadece günde 4 kere yapabilir)
- Merkezin yerini değiştirmek
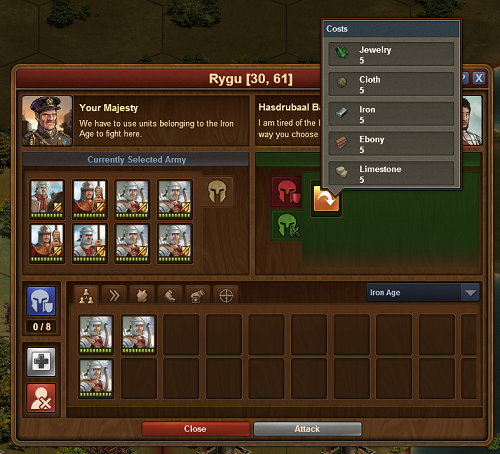
Lonca Hazinesi
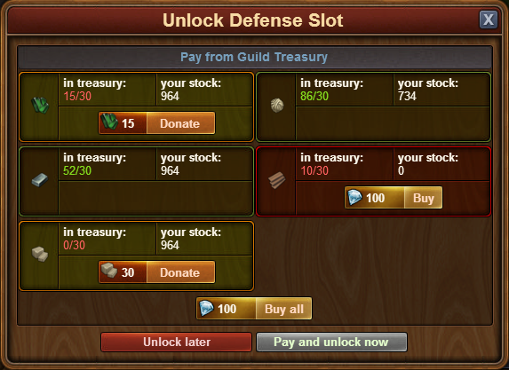
Loncanız fetihler yaptıkça ve bölgelerini genişlettikçe, ürün maliyetleri artar. Yeni bir kuşatma ordusu konumlandırmak ya da savunma yerinin kilidini açmak için bütün lonca üyelerinizin ürün katkısı yapması gerekebilir ve burada lonca hazinesi devreye girer. Bir ordu konumlandırmaya kalktığınızda; önce lonca hazinenize bağış yapabileceğiniz kilit açma ekranıyla karşılarşırsınız.
Aşağıdaki görüntüde 30 demir ve giysi talep edilmektedir, istenen sayılar yeşil olarak gösterildiği için zaten lonca hazinenizde mevcut demektir. Aynı zamanda loncanın ödeyebilmesi için önce toplaması gereken abanoz, mücevher ve kireçtaşı da talep edilmektedir. Ürün gereksinimlerinin yanındaki butonlar oyuncu olarak ne kadar ürün katkısı sağlayabileceğinizi gösterir. Bu örnekte 15 mücevher ve 15 kireçtaşı. Aynı zamanda loncanız için abanoz temin etmekte elmas kullanabilirsiniz. Bütün ürün gereksinimleri karşılabildiğinde savunma yerinin kilidi açılabil
İPUCU: Artık istemediğiniz bir bölgeye özgürlük vermek o bölgeye harcadığınız ürünlerin bir kısmının hazinenize geri ödenmesini sağlayacaktır
Ayrıca isterseniz hazine ekranındayken lonca hazinesine ürün bağışı yapabilirsiniz.
GvG Terimleri
Aşağıda bilmenizin fayda sağlayacağı lonca kıta haritası terimleri sıralanmıştır:
Saldırı Koruması - Bir bölgeyi yeni ele geçirdiğinizde o bölgeye başka bir lonca bir sonraki günlük hesaplamaya kadar saldıramaz. Aynı zamanda bu bölge merkez bölgeniz olmadığı sürece, yine bir sonraki hesaplamaya kadar ona komşu bölgelere saldıramaz, kuşatma ordusu konumlandıramazsınız.
Ortalama Güç - Bir eyaletteki bir sektörün sahip olabileceği ortalama güç.
Kuşatılmış/kuşatma altında - düşman kuşatması altında olan bir sektör. Kuşatılmış sektörler güç üretmez ve bir çok eylem bu sektörler için mümkün değildir. (Savunma ordusu konumlandırmak, merkez yerini değiştirmek ve özgürlük vermek gibi)
İnşaat indirimi - Loncanın seviyesine bağlı olarak, bütün lonca üyeleri bütün binalar için para ve erzak maliyetinde bir indirim alır.
Koordinatlar - Eyalet haritasında her bir sektörün yerini belirlemekte kullanılan tanımlayıcı sayılar.
Günlük Hesaplama - Her günün sonunda günlük hesaplama sırasında lonca gücü puanları hesaplanır ve saldırı korumaları kaldırılır.
Savunma Ordusu - Her bir sektör 8 adete kadar savunma ordusu bulundurabilir ve bu her bir savunma ordusunun 10 defa yenilmesi gerekir.
Özgürlük Verme - Bir lonca, kontrolündeki bir sektöre özgürlük verdiğinde o sektör bütün savunma ordularıyla beraber NPC kontrolüne geçer ve lonca bu eylem sonrasında o sektöre harcadığı ürünlerin bir kısmını geri alır.
Lonca Kıta Haritası - eyaletlerin bulunduğu lonca haritası. GVG'ye giriş yaparak ulaşabilirsiniz.
Lonca Seviyesi - Eyalet haritalarının toplam gücü lonca seviyesine katkı yapar. Yeterli puan toplandığında lonca seviye atlar ve tüm üyelerine bonuslar sağlar.
Lonca Sıralaması - Bütün loncaları prestijlerine göre listeleyen bir sıralama.
Lonca Hazinesi - Lonca hazinesinde oyuncular ve diğer bazı şekillerde üretilen ürünler depolanır. Bu ürünler slot açmak veya asker konumlandırılırken kullanılır.
Guild versus Guild - GvG loncalar arası savaş anlamına gelen özelliğin açılımıdır.
Lonca Alanı - Bir eyalette loncanın sahip olduğu sektörler.
GvG / GVG - Loncalar arası savaş “Guild versus Guild” anlamında bir kısaltma.
Merkez - Loncanın bir eyalette aldığı ilk sektör merkez sektör olur. Daha sonra yeri değiştirilerek başka sektörler merkez yapılabilir. Destek bonuslarının dağıtımı açısından önemlidir. Aynı zamanda merkez sektörden her zaman komşu sektörlere kuşatma ordusu konumlandırılabilir. (24 saat koruması yoktur ). HQ - Merkez için kısaltma
Başlangıç alanı - Her eyalette haritaya giriş yapacak loncaların ilk kuşatmalarını konumlandırabileceği belirlenmiş alanlar.
Harita sıralaması - Her eyalet loncaların günlük güçlerine göre sıralandığı bir harita sıralamasına sahiptir.
NPC - “oyuncu olmayan karakter” anlamında kısaltma. – Eğer gir sektör herhangi bir loncanın kontrolünde değilse, NPC kontrolündedir.
Sahip - O bölgeye sahip olan lonca ya da NPC'nin adı.
Güç - Bir sektör o sektöre sahip olan lonca için günlük olarak hesaplama sırasında güç üretir.
Prestij - Prestij loncanın seviyesine ve sahip olduğu günlük güce göre hesaplanır, Lonca sıralamasının belirlenmesinde kullanılır.
Prestij Bonusu - Lonca seviyesine bağlı olarak lonca her gün belirli bir miktar prestij puanı kazanır.
Eyalet - Lonca kıta haritası loncaların savaştığı eyaletlerden oluşur. Her bir çağ için bir eyalet vardır ve o eyaletde sadece o çağın ürünleri ve askeri birlikleri kullanılır.
Eyalet Çağı - Oyundaki çağlara göre belirlenen eyaletlerin çağı.Her bir çağ için bir eyalet vardır ve o eyalette sadece o çağın ürünleri ve askeri birlikleri kullanılır.
Asker Yetiştirme Desteği - Lonca seviyesine bağlı olarak birliklerin yetişmesi ve iyileşmesi için gerekli süre bütün lonca üyeleri için azalır.
Merkez yerini değiştirmek - Merkezin olduğu sektör ya da yeni konumlandırılacağı sektör kuşatma altında olmadığı sürece, biir lonca merkezinin yerini değiştirebilir.
'Araştırma Desteği - Lonca Seviyesine bağlı olarak bütün lonca üyeleri yönetim binasından ek ilerleme puanı kazanır.
Kuşatma Ordusu - Loncanın bir sektörü ele geçirmesi için öncelikle, loncanın bir üyesi tarafından o sektöre bir kuşatma ordusu konumlandırılması gerekir. Kuşatma ordusunun konumlandırılmasından sonra, o sektördeki savunma orduları bütün lonca üyeleri tarafından saldırılabilir hale gelir. Kuşatma ordusunun kendisi saldırmaz ama kuşatma ordusuna saldırılabilir ve kuşatma ordusu yenilerek kuşatma kaldırılabilir.
Destek Bonusu - Loncanın sahip olduğu bir sektördeki bütün savunma orduları ya da loncanın konumlandırdığı bir kuşatma ordusu destek bonusuna sahip olabilir. Lonca destek havuzuna, destek faktörüne ve merkeze uzaklığa göre hesaplanır.
Destek Faktörü - Her eyalete özgü bir faktördür. Destek havuzu/destek faktörü= o eyalet için toplam destek bonusu.
Destek Havuzu - Bütün lonca üyeleri sahip oldukları belirli bazı binalar ile lonca destek havuzuna katkıda bulunabilir. Destek havuzu ve bir eyaletin destek faktörü lonca için o eyaletteki toplam destek bonusunu belirler.
Destek havuzu Bonusu - Lonca seviyesiyle birlikte lonca destek havuzu artar.
Kilit Açma - Bir sektör için toplamda maksimum 8 olmak üzere, savunma ordusu konumlandırmak için savunma yeri kilidi açmak. Bu eylem ürün harcamayı gerektirir.
Kilidi açılmış Savunma Yeri - Kilidi açılmış, savunma ordusu yerleştirilebilir haldeki savunma yeri.